Although with many implementations of the Workspace One platform Workspace One Access is configured as the IDP (personally preferred when using this platform) I also encounter customers where EntraID is the preferred IDP with mostly valid reasons. There are use cases this is the better choice.
With the flexibility Workspace One Access offers this is no issue at all. But when shifting the IDP to EntraID I usually advice to also shift the Conditional Access policies to EntraID. In my opinion a must have since it is never a good idea to have two captains on one ship.

But did you know you can use EntraID Certificate based Authentication and use the built in Workspace ONE UEM Certificate Authority (Airwatch CA) issuing the certificates instead of a third-party CA? Yes, this variant of EUC noodle soup popped up…let’s add the herbs and give it some flavour!
Let me take you through the steps, one remark, I will show you how to use the Certificate for Single-factor authentication. I strongly recommend embedding this in a MultiFactor Authentication (MFA) strategy and embed in your Condintial Access policy's! Also, I assume you know how use the built-in CA and how to configure the profile in WSone UEM to push a certificate to the device/user with UEM.
The steps:
First, we need the RootCA certificate of the Workspace One UEM Certificate Authority so we can upload it to EntraID
go to the settings, Enterprise Integration
Workspace One Access
Configuration
Export the certificate

Next, we switch to EntraID Admin Center and add the Certificate Authority

Upload the certificate you’ve just downloaded:

Now we enable the Certificate-based Authentication
go to Authentication Methods
Click on Certificate-based Authentication

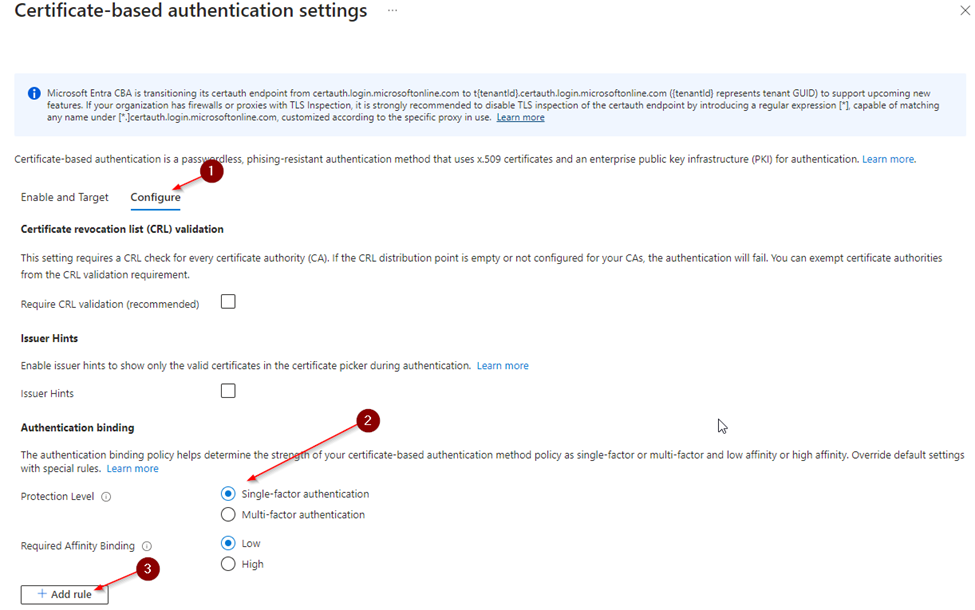
To configure the settings
1. Click Configure
Scroll down to authentication binding
2. Select Single-factor authentication
3. Click the Add rule button
configure the authentication binding policy rule
Select Certificate issuer
Click the dropdown in Certificate issuer identifier
Select the Certificate Authority
Select Single-factor authentication

We need to map the attribute to extract the username, click Add Rule

Configure the rule
· In certificate Field select “Principal Name”
· In User attribute select “UserPrincipalName”

Enable it (mandatory target it to a specific group, advisable for testing) and good to go!

And now let’s see if it works!

Example of the cert popup! And yes, there are ways to auto select the correct certificate, but that is one for another day.

Select the certificate, and we are in!

But what about the CRL…you did not enable it!
Well in short. Just no. the certificate of the UEM RootCA has no CRL configured so, do not enable this (or add it this specific CA to the exemption in the configuration) or the authentication will fail:

Hope this helps someone and if you have any comments, tips or remarks, feel free to leave a comment! And remember: “Not all treasure is silver and gold, mate!”
Comments